CURLOPT_RESOLVE explained
Synopsis
Description
Pass a pointer to a linked list of strings with host name resolve information to use for requests with this handle. The linked list should be a fully valid list of struct curl_slist structs properly filled in. Use curl_slist_append to create the list and curl_slist_free_all to clean up an entire list.
Each single name resolve string should be written using the format [+]HOST:PORT:ADDRESS[,ADDRESS]. where HOST is the name libcurl will try to resolve, PORT is the port number of the service where libcurl wants to connect to the HOST and ADDRESS is one or more numerical IP addresses. If you specify multiple ip addresses they need to be separated by comma. If libcurl is built to support IPv6, each of the ADDRESS entries can of course be either IPv4 or IPv6 style addressing.
This option effectively pre-populates the DNS cache with entries for the host+port pair so redirects and everything that operations against the HOST+PORT will instead use your provided ADDRESS.
The optional leading «+» signifies whether the new entry should time-out or not. Entries added with «HOST. » will never time-out whereas entries added with «+HOST. » will time-out just like ordinary DNS cache entries.
If the DNS cache already has an entry for the given host+port pair, then this entry will be removed and a new entry will be created. This is because the old entry may have have different addresses or a different time-out setting.
An ADDRESS provided by this option will only be use if not restricted by the setting of CURLOPT_IPRESOLVE to a different IP version.
Remove names from the DNS cache again, to stop providing these fake resolves, by including a string in the linked list that uses the format «-HOST:PORT». The host name must be prefixed with a dash, and the host name and port number must exactly match what was already added previously.
Support for providing the ADDRESS within [brackets] was added in 7.57.0.
Support for providing multiple IP addresses per entry was added in 7.59.0.
Support for adding non-permanent entries by using the «+» prefix was added in 7.75.0.
ИТ База знаний
Полезно
— Онлайн генератор устойчивых паролей
— Онлайн калькулятор подсетей
— Руководство администратора FreePBX на русском языке
— Руководство администратора Cisco UCM/CME на русском языке
— Руководство администратора по Linux/Unix
Навигация
Серверные решения
Телефония
FreePBX и Asterisk
Настройка программных телефонов
Корпоративные сети
Протоколы и стандарты
15 примеров CURL в Linux
В середине 1990-х годов, когда Интернет еще только начинал развиваться, шведский программист по имени Даниэль Стенберг начал проект, который в конечном итоге превратился в то, что мы сегодня знаем, как Curl. Первоначально он стремился разработать бота, который бы периодически загружал курсы валют с веб-страницы и предоставлял пользователям IRC эквиваленты шведских крон в долларах США. Проект процветал, добавлялись новые протоколы и функции, и в конце концов мы получили тот функционал, который имеем сейчас.

Посмотреть версию curl
Опции -V или —version будут возвращать не только версию, но также поддерживаемые протоколы и функции в текущей версии.
Скачать файл
Если вы хотите загрузить файл, вы можете использовать curl с опциями -O или -o. Первый сохранит файл в текущем рабочем каталоге с тем же именем, что и в удаленном местоположении, тогда как второй позволяет вам указать другое имя файла и/или местоположение.
Возобновить прерванную загрузку
Скачать несколько файлов
С помощью следующей команды вы сразу загрузите info.html и about.html с http://merionet.ru и http://wiki.merionet.ru соответственно.
Скачать URL из файла
Если вы комбинируете curl с xargs, вы можете загружать файлы из списка URL-адресов в файле.
Использовать прокси с аутентификацией или без нее
Если вы находитесь за прокси-сервером, прослушивающим порт 8080 на proxy.yourdomain.com, сделайте это:
где вы можете пропустить -U user: пароль, если ваш прокси не требует аутентификации.
Заголовки запроса HTTP
Заголовки HTTP позволяют удаленному веб-серверу отправлять дополнительную информацию о себе вместе с фактическим запросом. Это предоставляет клиенту подробную информацию о том, как обрабатывается запрос.
Чтобы запросить заголовки HTTP с сайта, выполните:
Эта информация также доступна в инструментах разработчика вашего браузера.
Сделать запрос POST с параметрами
Следующая команда отправит параметры firstName и lastName вместе с соответствующими значениями на https://merionet.ru/info.php.
Вы можете использовать этот совет для имитации поведения обычной формы HTML.
Загрузка файлов с FTP-сервера с аутентификацией или без нее
Если удаленный FTP-сервер ожидает подключения по адресу ftp://yourftpserver, следующая команда загрузит yourfile.tar.gz в текущий рабочий каталог.
где вы можете пропустить -u username: password, если FTP-сервер разрешает анонимный вход.
Загрузить файлы на FTP-сервер с аутентификацией или без
Чтобы загрузить локальный файл mylocalfile.tar.gz в ftp://yourftpserver с помощью curl, выполните:
Указание пользовательского агента
Пользовательский агент является частью информации, которая отправляется вместе с HTTP-запросом. Это указывает, какой браузер клиент использовал, чтобы сделать запрос.
Хранение Cookies
Хотите узнать, какие файлы cookie загружаются на ваш компьютер, когда вы заходите на https://www.cnn.com? Используйте следующую команду, чтобы сохранить их в cnncookies.txt. Затем вы можете использовать команду cat для просмотра файла.
Отправить файлы cookie сайта
Вы можете использовать файлы cookie, полученные в последнем совете, при последующих запросах к тому же сайту.
Изменить разрешение имени
Если вы веб-разработчик и хотите протестировать локальную версию merionet.ru, прежде чем запускать ее в живую версию, вы можете настроить разрешение curl http://www.merionet.ru для своего локального хоста следующим образом:
Таким образом, запрос к http://www.merionet.ru скажет curl запрашивать сайт у localhost вместо использования DNS или файла /etc /hosts.
Ограничить скорость загрузки
Чтобы предотвратить потерю пропускной способности, вы можете ограничить скорость загрузки до 100 КБ/с следующим образом.
Онлайн курс по Linux
Мы собрали концентрат самых востребованных знаний, которые позволят тебе начать карьеру администратора Linux, расширить текущие знания и сделать уверенный шаг к DevOps
cURL Command Tutorial with Examples

cURL is a command line tool and a library which can be used to receive and send data between a client and a server or any two machines connected over the internet. It supports a wide range of protocols like HTTP, FTP, IMAP, LDAP, POP3, SMTP and many more.
Due to its versatile nature, cURL is used in many applications and for many use cases. For example, the command line tool can be used to download files, testing APIs and debugging network problems. In this article, we shall look at how you can use the cURL command line tool to perform various tasks.
Install cURL
Linux
Most Linux distributions have cURL installed by default. To check whether it is installed on your system or not, type curl in your terminal window and press enter. If it isn’t installed, it will show a “command not found” error. Use the commands below to install it on your system.
For Ubuntu/Debian based systems use:
For CentOS/RHEL systems, use:
On the other hand, for Fedora systems, you can use the command:
MacOS
MacOS comes with cURL preinstalled, and it receives updates whenever Apple releases updates for the OS. However, in case you want to install the most recent version of cURL, you can install the curl Homebrew package. Once you install Homebrew, you can install it with:
Windows
Next, you should add cURL’s bin directory to the Windows PATH environment variable, so that Windows can find it when you type curl in the command prompt. For this to work, you need to follow these steps:
Once you complete the above steps, you can type curl to check if this is working. If everything went well, you should see the following output:
cURL basic usage
The basic syntax of using cURL is simply:
This is the most basic operation cURL can perform. In the next few sections, we will look into the various command line options accepted by cURL.
Downloading Files with cURL
In addition to saving the contents, cURL switches to displaying a nice progress bar with download statistics, such as the speed and the time taken:


Anatomy of a HTTP request/response
Before we dig deeper into the features supported by cURL, we will discuss a little bit about HTTP requests and responses. If you are familiar with these concepts, you directly skip to the other sections.
To request a resource such as a webpage, or to submit some data to a server, a HTTP client (such as a browser or cURL) makes a HTTP request to the server The server responds back with a HTTP response, which contains the “contents” of that page.
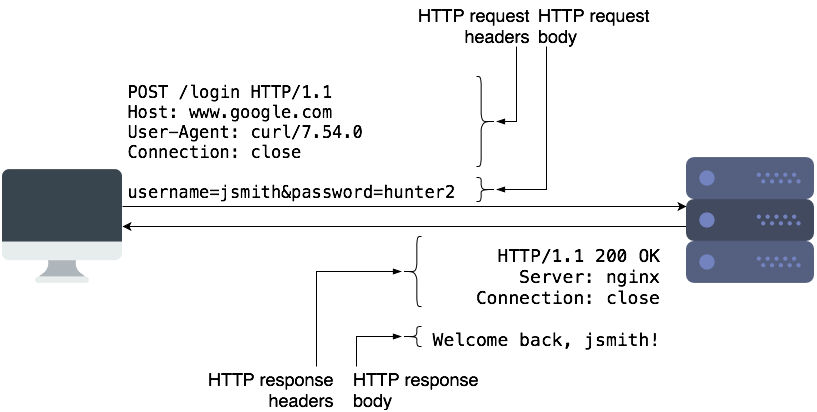
HTTP requests contain the request method, URL, some headers, and some optional data as part of the “request body”. The request method controls how a certain request should be processed. The most common types of request methods are “GET” and “POST”. Typically, we use “GET” requests to retrieve a resource from the server, and “POST” to submit data to the server for processing. “POST” requests typically contain some data in the request body, which the server can use.
HTTP responses are similar and contain the status code, some headers, and a body. The body contains the actual data that clients can display or save to a file. The status code is a 3-digit code which tells the client if the request succeeded or failed, and how it should proceed further. Common status codes are 2xx (success), 3xx (redirect to another page), and 4xx/5xx (for errors).
HTTP is an “application layer protocol”, and it runs over another protocol called TCP. It takes care of retransmitting any lost data, and ensures that the client and server transmit data at an optimal rate. When you use HTTPS, another protocol called SSL/TLS runs between TCP and HTTP to secure the data.
Most often, we use domain names such as google.com to access websites. Mapping the domain name to an IP address occurs through another protocol called DNS.
You should now have enough background to understand the rest of this article.
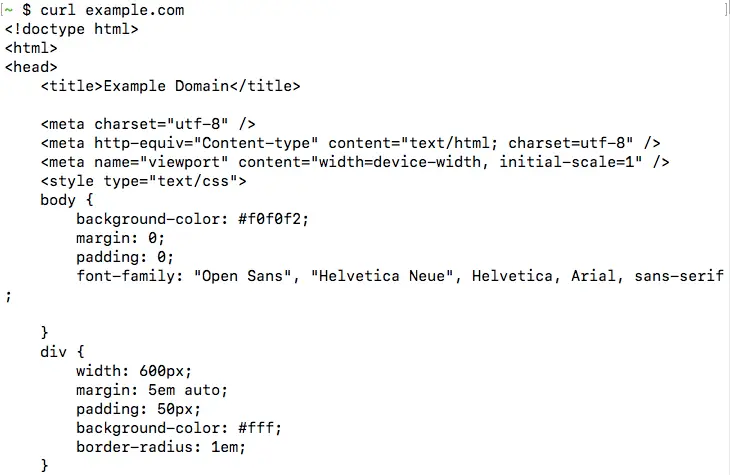
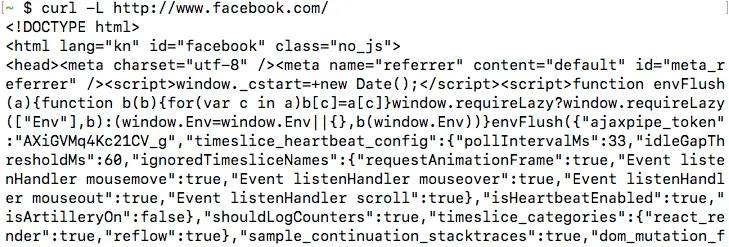
Following redirects with cURL

Now, you will be able to see the HTML content of the page, similar to the screenshot below. In the next section, we will see how we can verify that there is a HTTP 3XX redirect.
Please bear in mind that cURL can only follow redirects if the server replied with a “HTTP redirect”, which means that the server used a 3XX status code, and it used the “Location” header to indicate the new URL. cURL cannot process Javascript or HTML-based redirection methods, or the “Refresh header“.
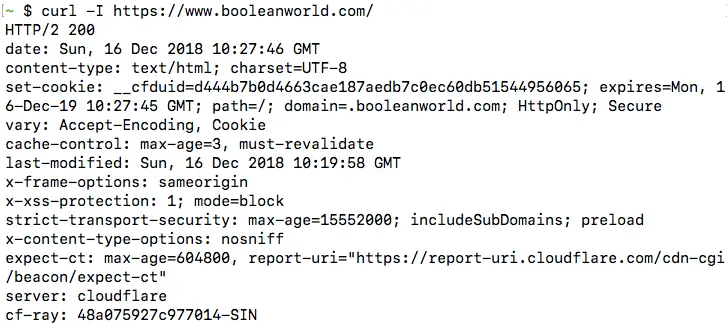
Viewing response headers with cURL
Once you run the command, you will be able to see the HTTP 3XX redirect, as well as the page HTTP 200 OK response after following the redirect:

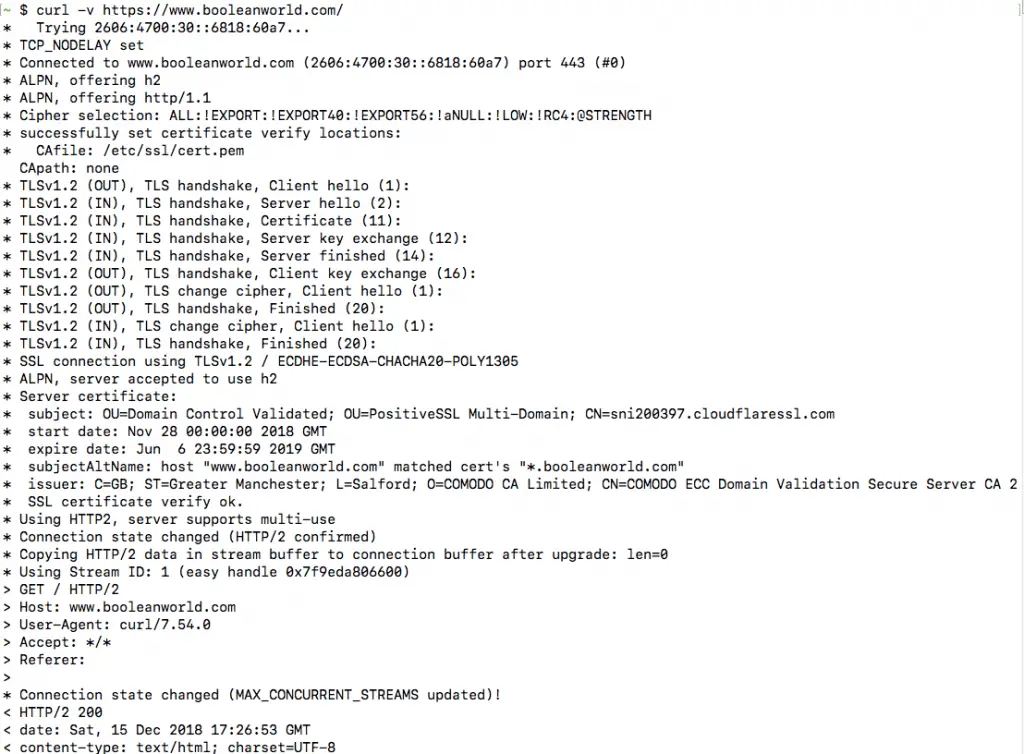
Viewing request headers and connection details
The output contains request data (marked with > ), response headers (marked with ) and other details about the request, such as the IP used and the SSL handshake process (marked with * ). The response body is also available below this information. (However, this is not visible in the screenshot below).
Most often, we aren’t interested in the response body. You can simply hide it by “saving” the output to the null device, which is /dev/null on Linux and MacOS and NUL on Windows:
Silencing errors
So, if you are trying to save cURL output to a file but simply want to hide the progress bar, you can use:
Setting HTTP request headers with cURL
(httpbin.org is a very useful website that allows you to view details of the HTTP request that you sent to it.)
The data returned by the URL shows that this header was indeed set:
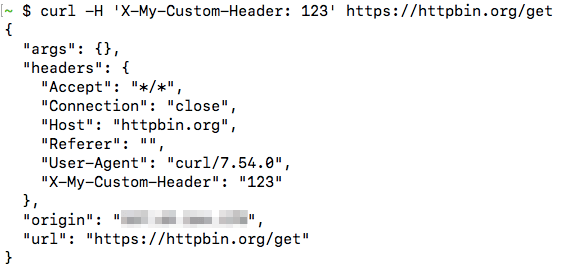
You can also override any default headers sent by cURL such as the “User-Agent” or “Host” headers. The HTTP client (in our case, cURL) sends the “User-Agent” header to tell the server about the type and version of the client used. Also, the client uses the “Host” header to tell the server about the site it should serve. This header is needed because a web server can host multiple websites at a single IP address.
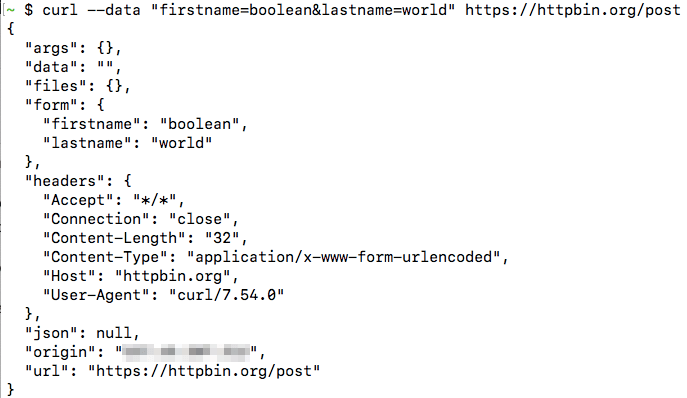
Making POST requests with cURL
From the output, you can easily tell that we posted two parameters (this appears under the “form” key):
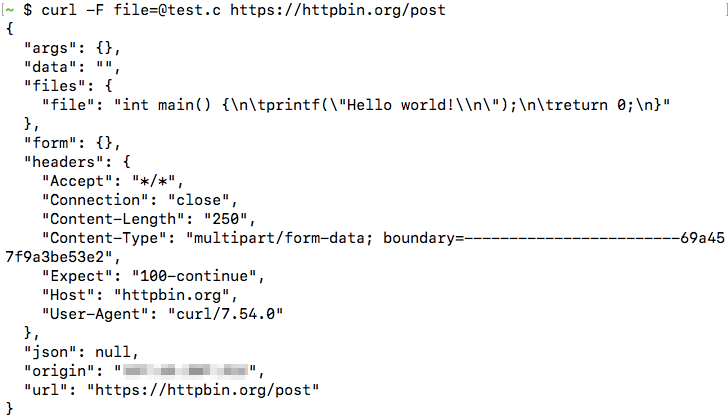
This shows the content of the file, showing that it was submitted successfully:
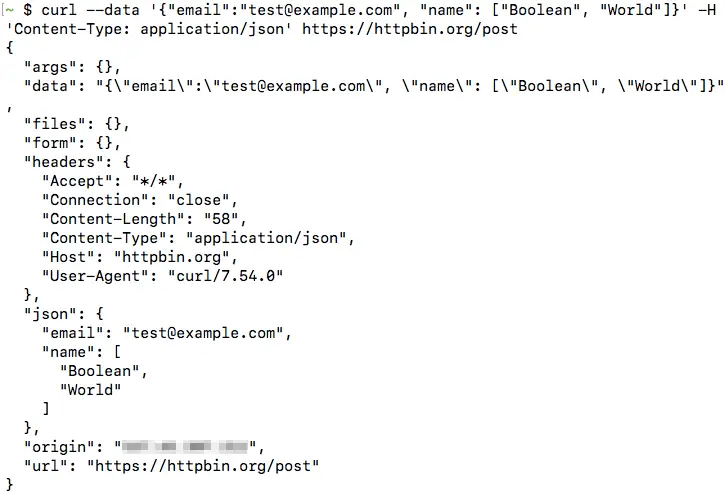
Submitting JSON data with cURL
So if you had the following JSON data and want to make a POST request to https://httpbin.org/post:
Then, you can submit the data with:
In this case, you can see the data appear under the json value in the httpbin.org output:
You can also save the JSON file, and submit it in the same way as we did previously:
Changing the request method
When you make a HEAD request, cURL displays all the request headers by default. Servers do not send any content when they receive a HEAD request, so there is nothing after the headers:
Replicating browser requests with cURL
If you want to replicate a request made through your browser through cURL, you can use the Chrome, Firefox and Safari developer tools to get a cURL command to do so.
The steps involved are the same for all platforms and browsers:
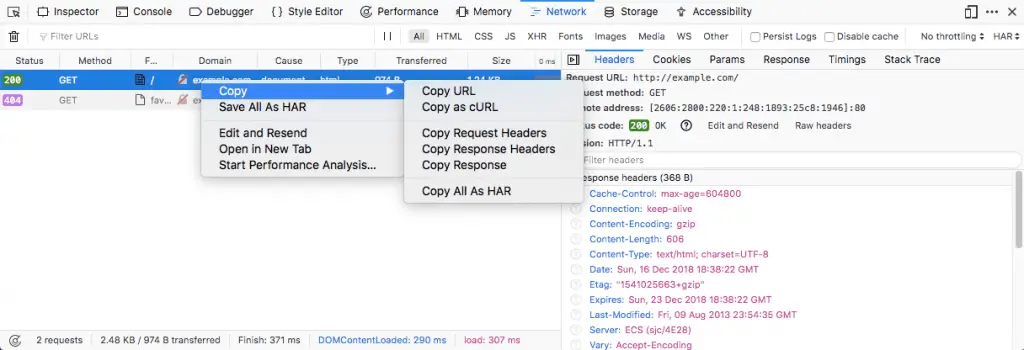
The copied command contains all the headers, request methods, cookies etc. needed to replicate the exact same request. You can paste the command in your terminal to run it.
Making cURL fail on HTTP errors
Interestingly, cURL doesn’t differentiate between a successful HTTP request (2xx) and a failed HTTP request (4xx/5xx). So, it always returns an exit status of 0 as long as there was no problem connecting to the site. This makes it difficult to write shell scripts because there is no way to check if the file could be downloaded successfully.
You can check this by making a request manually:
You can see that curl doesn’t print any errors, and the exit status is also zero:

Now, you can see that cURL prints an error and also sets the status code to 22 to inform that an error occured:

Making authenticated requests with cURL
Alternatively, you can simply add it to the URL itself, with the :
In both of these methods, curl makes a “Basic” authentication with the server.
Testing protocol support with cURL
The request takes place normally, which means that the site supports TLSv1.2. Now, let us check if the site supports SSL v3:
This command throws a handshake_failed error, because the server doesn’t support this version of SSL.
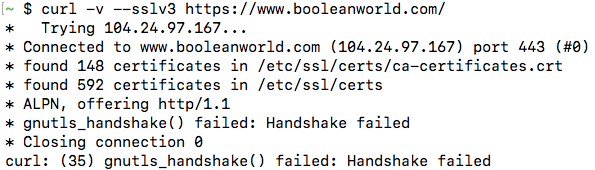
Please note that, depending on your system and the library version/configuration, some of these version options may not work. The above output was taken from Ubuntu 16.04’s cURL. However, if you try this with cURL in MacOS 10.14, it gives an error:

Unfortunately, this doesn’t work so well for websites using HTTPS. A single website may be configured to serve multiple websites, with each website using its own SSL/TLS certificate. Since SSL/TLS takes place at a lower level than HTTP, this means clients such as cURL have to tell the server which website we’re trying to access at the SSL/TLS level, so that the server can pick the right certificate. By default, cURL always tells this to the server.
However, if you want to send a request to a specific IP like the above example, the server may pick a wrong certificate and that will cause the SSL/TLS verification to fail. The Host header only works at the HTTP level and not the SSL/TLS level.
The two commands mentioned above are equivalent.
Resolve domains to IPv4 and IPv6 addresses
Please bear in mind that a website can be reached over IPv4 and IPv6 only if:
For example, if you want to check if you can reach the website icanhazip.com over IPv6, you can use:
If the site is reachable over HTTPS, you should get your own IPv6 address in the output. This website returns the public IP address of any client that connects to it. So, depending on the protocol used, it displays an IPv4 or IPv6 address.
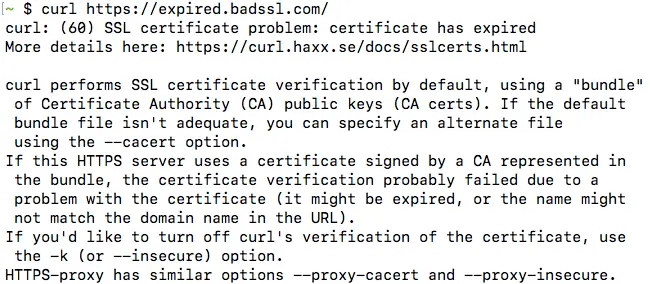
Disabling cURL’s certificate checks
By default, cURL checks certificates when it connects over HTTPS. However, it is often useful to disable the certificate checking, when you are trying to make requests to sites using self-signed certificates, or if you need to test a site that has a misconfigured certificate.
Troubleshooting website issues with “cURL timing breakdown”
(If you are running this from a Windows system, change the /dev/null to NUL ).
You will get some output similar to this:
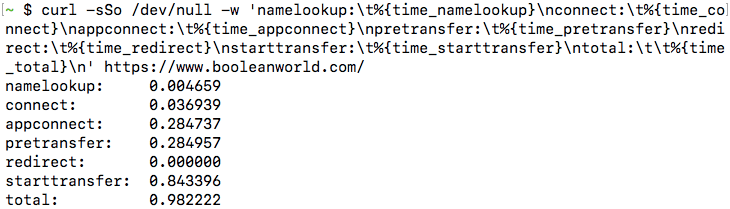
Each of these values is in seconds, and here is what each value represents:
As an example, say, you are facing delays connecting to a website and you notice the “namelookup” value was too high. As this indicates a problem with your ISP’s DNS server, you may start looking into why the DNS lookup is so slow, and switch to another DNS server if needed.
cURL configuration files
Sometimes, you may want to make all cURL requests use the same options. Passing these options by hand isn’t a feasible solution, so cURL allows you to specify options in a configuration file.
The default configuration file is located in
/.curlrc in Linux/MacOS and %appdata%\_curlrc in Windows. Inside this file, you can specify any options that you need, such as:
Conclusion
In this article, we have covered the most common uses of the cURL command. Of course, this article only scratches the surface and cURL can do a whole lot of other things. You can type man curl in your terminal or just visit this page to see the man page which lists all the options.
Команда curl. Синтаксис. Примеры использования
Сurl – утилита командной строки для скачивания и загрузки данных. Она выросла из проекта шведского программиста Даниэля Стенберга. Изначально в середине 90-х, на заре развития Интернета, он разрабатывал бота, который должен был загружать с веб-страницы курсы валют и сообщать пользователям IRC эквивалент шведских крон в долларах США. Со временем проект развивался, появлялась поддержка различных протоколов и новые функции. Теперь curl используется для передачи любых данных и ряда других полезных задач. Рассмотрим основные моменты работы с этим инструментом.
Синтаксис и опции curl
Синтаксис команды следующий:
В качестве аргумента задается, как правило, URL скачиваемого файла. Основные опции перечислены ниже
Основные опции мы рассмотрим на простых примерах.
Просмотр версии curl
Если вам требуется скачать файл, запустите curl с опцией –O или –o. Первая из них сохраняет файл в текущей рабочей директории под тем же именем, что и в удаленном месторасположении. Вторая опция позволяет вам указать другое имя и/или место для скачивания.
Cохранение файла под исходным именем (yourfile) в текущей рабочей директории.
Cохранение файла под именем newfile в директории /tmp/examplе/.
Возобновление прерванной загрузки
Если скачивание по какой-то причине было прервано (например, пользователь нажал Ctrl+C), вы легко можете возобновить его с момента остановки при помощи опции -C – (дефис, С, тире):
Скачивание нескольких файлов
Следующая команда позволит вам скачать info.html с http://yoursite.com и about.html c http://mysite.com в один прием:
Если использовать curl вместе с командой xargs, можно скачивать файлы в соответствии со списком URL, заданном в файле (в данном примере listurls.txt):
Использование прокси-сервера
Если вы подключены через прокси-сервер, нужно указать его команде curl при помощи следующих опций (в данном примере имя сервера proxy.yourdomain.com, порт 8080, имя пользователя user, пароль qwerty1234):
Запрос HTTP-заголовков
HTTP-заголовки позволяют удаленному веб-серверу помимо ответа на сам запрос отправлять дополнительную информацию. Она предоставляет клиенту данные о том, как обрабатывать ответ:
Также эту информацию можно получить, воспользовавшись функциями браузера для разработчиков.
cURL POST-запросы с параметрами
Следующая команда отправит на https://yourdomain.com/info.php параметры firstName и lastName с соответствующими значениями:
Этим приемом можно пользоваться для симуляции работы обычных веб-форм.
Следующая команда скачивает в текущую рабочую директорию файл yourfile с удаленного FTP-сервера ftp://yourftpserver (имя пользователя user, пароль qwerty1234):
Если FTP-сервер поддерживает анонимный вход, параметр –u с именем пользователя и пароля указывать не нужно.
Загрузка файлов на FTP-сервер
Для загрузки локального файла mylocalfile.tar.gz воспользуйтесь следующей командой:
Указание агента пользователя
Агент пользователя – часть информации HTTP-запроса. Она показывает, каким браузером пользуется клиент. Можно посмотреть, что имеющаяся версия curl передает по умолчанию и установить новое значение:
Запись файлов cookie с веб-сайта
Хотите посмотреть, какие файлы cookie скачиваются на ваш компьютер, когда вы заходите на определенный сайт? Опция —cookie-jar сохраняет их список в файл, который в дальнейшем можно просмотреть при помощи команды cat.
Отправка файлов cookie на сайт
Полученные в предыдущем примере файлы cookie можно использовать в дальнейших запросах к тому же самому сайту:
Изменение разрешения имен
Если вы веб-разработчик и хотите протестировать локальную версию сайта, прежде чем загружать его на сервер, при помощи опции —resolve можно указать curl выполнять разрешение имени вашего сайта на адрес локального узла, например:
Таким образом, при запросе на http://www.yourdomain.com curl будет запрашивать сайт с локального узла, а не использовать DNS или файл /etc/hosts.
Ограничение скорости скачивания
Чтобы curl не занимал всю пропускную способность канала, можно ограничить скорость скачивания при помощи опции —limit-rate:
Заключение
Мы рассмотрели краткую историю появления curl и наиболее характерные примеры применения этой команды. Для более подробной информации можно обратиться к соответствующей man-странице.
Если вы нашли ошибку, пожалуйста, выделите фрагмент текста и нажмите Ctrl+Enter.