How to Load and Unload Kernel Modules in Linux
A kernel module is a program which can loaded into or unloaded from the kernel upon demand, without necessarily recompiling it (the kernel) or rebooting the system, and is intended to enhance the functionality of the kernel.
In general software terms, modules are more or less like plugins to a software such as WordPress. Plugins provide means to extend software functionality, without them, developers would have to build a single massive software with all functionalities integrated in a package. If new functionalities are needed, they would have to be added in new versions of a software.
Likewise without modules, the kernel would have to be built with all functionalities integrated directly into the kernel image. This would mean having bigger kernels, and system administrators would need to recompile the kernel every time a new functionality is needed.
A simple example of a module is a device driver – which enables the kernel to access a hardware component/device connected to the system.
List All Loaded Kernel Modules in Linux
To list all currently loaded modules in Linux, we can use the lsmod (list modules) command which reads the contents of /proc/modules like this.
How to Load and Unload (Remove) Kernel Modules in Linux
To load a kernel module, we can use the insmod (insert module) command. Here, we have to specify the full path of the module. The command below will insert the speedstep-lib.ko module.
To unload a kernel module, we use the rmmod (remove module) command. The following example will unload or remove the speedstep-lib.ko module.
How to Manage Kernel Modules Using modprobe Command
Here, you don’t need the absolute path of a module; this is the advantage of using modprobe over the previous commands.
To insert a module, simply provide its name as follows.
Note: Under modprobe, automatic underscore conversion is performed, so there is no difference between _ and – while entering module names.
For more usage info and options, read through the modprobe man page.
Do not forget to check out:
That’s all for now! Do you have any useful ideas, that you wanted us to add to this guide or queries, use the feedback form below to drop them to us.
If You Appreciate What We Do Here On TecMint, You Should Consider:
TecMint is the fastest growing and most trusted community site for any kind of Linux Articles, Guides and Books on the web. Millions of people visit TecMint! to search or browse the thousands of published articles available FREELY to all.
If you like what you are reading, please consider buying us a coffee ( or 2 ) as a token of appreciation.

We are thankful for your never ending support.
Kernel module (Русский)
Модули ядра — это отдельные кусочки кода, которые могут быть загружены и выгружены из ядра по мере необходимости. Они расширяют функциональность ядра без необходимости перезагрузки системы.
Contents
Обзор
Чтобы создать модуль ядра, вы можете прочитать The Linux Kernel Module Programming Guide. Модуль можно сконфигурировать как вкомпилированный, а можно как загружаемый. Чтобы иметь возможность динамически загружать или выгружать модуль, его необходимо сконфигурировать как загружаемый модуль в настройке ядра (в этом случае строка, относящаяся к модулю должна быть отмечена буквой M ).
Получение информации
Чтобы узнать, какие модули ядра загружены в настоящий момент:
Чтобы показать информацию о модуле:
Чтобы вывести список опций, с которыми загружен модуль:
Чтобы отобразить настройки для всех модулей:
Чтобы отобразить настройки для отдельного модуля:
Чтобы узнать зависимости модуля (или его псевдонима), включая сам модуль:
Автоматическое управление модулями
Сегодня все необходимые загрузки модулей делаются автоматически с помощью udev, поэтому если вам не нужно загружать какие-либо модули, не входящие в стандартное ядро, вам не придётся прописывать модули, требующиеся для загрузки в каком-либо конфигурационном файле. Однако, бывают случаи, когда вам необходимо загружать свой модуль в процессе загрузки или наоборот не загружать какой-то стандартный модуль, чтобы ваш компьютер правильно функционировал.
Смотрите modules-load.d(5) для дополнительной информации.
Управление модулями вручную
Альтернативный вариант выгрузки модуля:
Настройка параметров модуля
Чтобы передать параметр модулю ядра, вы можете воспользоваться конфигурационным файлом в modprobe или использовать командную строку ядра.
С помощью файлов в /etc/modprobe.d/
С помощью командной строки ядра
Если модуль вкомпилирован в ядро, вы также можете передать параметры модулю с помощью командной строки ядра. Для всех стандартных загрузчиков, подойдёт следующий синтаксис:
Просто добавьте это в загрузчике в строку с ядром, как описано в параметрах ядра.
Создание псевдонимов
У некоторых модулей есть алиасы, которые используются для их автоматической загрузки, когда они потребуются определённой программе. Отключение этих алиасов может предотвратить их автоматическую загрузку, при этом остаётся возможность из загрузки вручную.
Запрет загрузки
В терминах модулей ядра blacklisting означает механизм, предотвращающий загрузку какого-то модуля. Это может понадобиться, например если вам не нужна работа какого-то оборудования или если загрузка данного модуля вызывает проблемы: например, могут быть два модуля ядра, которые пытаются управлять одним и тем же оборудованием, и их совместная загрузка приводит к конфликту.
С помощью файлов в /etc/modprobe.d/
Можно изменить такое поведение. Команда install заставляет modprobe запускать вашу собственную команду вместо вставки модуля в ядро как обычно. Поэтому вы можете насильно сделать так, чтобы модуль никогда не загружался:
Это запретит данный модуль и все модули, зависящие от него.
С помощью командной строки ядра
Вы также можете запрещать модули из загрузчика.
Kernel module
Kernel modules are pieces of code that can be loaded and unloaded into the kernel upon demand. They extend the functionality of the kernel without the need to reboot the system.
To create a kernel module, you can read The Linux Kernel Module Programming Guide. A module can be configured as built-in or loadable. To dynamically load or remove a module, it has to be configured as a loadable module in the kernel configuration (the line related to the module will therefore display the letter M ).
Contents
Obtaining information
To show what kernel modules are currently loaded:
To show information about a module:
To list the options that are set for a loaded module:
To display the comprehensive configuration of all the modules:
To display the configuration of a particular module:
List the dependencies of a module (or alias), including the module itself:
Automatic module loading with systemd
Today, all necessary modules loading is handled automatically by udev, so if you do not need to use any out-of-tree kernel modules, there is no need to put modules that should be loaded at boot in any configuration file. However, there are cases where you might want to load an extra module during the boot process, or blacklist another one for your computer to function properly.
See modules-load.d(5) for more details.
Manual module handling
Kernel modules are handled by tools provided by kmod package. You can use these tools manually.
To unload a module:
Setting module options
To pass a parameter to a kernel module, you can pass them manually with modprobe or assure certain parameters are always applied using a modprobe configuration file or by using the kernel command line.
Manually at load time using modprobe
The basic way to pass parameters to a module is using the modprobe command. Parameters are specified on command line using simple key=value assignments:
Using files in /etc/modprobe.d/
Files in /etc/modprobe.d/ directory can be used to pass module settings to udev, which will use modprobe to manage the loading of the modules during system boot. Configuration files in this directory can have any name, given that they end with the .conf extension. The syntax is:
Using kernel command line
If the module is built into the kernel, you can also pass options to the module using the kernel command line. For all common bootloaders, the following syntax is correct:
Simply add this to your bootloader’s kernel-line, as described in Kernel Parameters.
Aliasing
Some modules have aliases which are used to automatically load them when they are needed by an application. Disabling these aliases can prevent automatic loading but will still allow the modules to be manually loaded.
Blacklisting
Blacklisting, in the context of kernel modules, is a mechanism to prevent the kernel module from loading. This could be useful if, for example, the associated hardware is not needed, or if loading that module causes problems: for instance there may be two kernel modules that try to control the same piece of hardware, and loading them together would result in a conflict.
Using files in /etc/modprobe.d/
Create a .conf file inside /etc/modprobe.d/ and append a line for each module you want to blacklist, using the blacklist keyword. If for example you want to prevent the pcspkr module from loading:
However, there is a workaround for this behaviour; the install command instructs modprobe to run a custom command instead of inserting the module in the kernel as normal, so you can force the module to always fail loading with:
This will effectively blacklist that module and any other that depends on it.
Using kernel command line
You can also blacklist modules from the bootloader.
Simply add module_blacklist=modname1,modname2,modname3 to your bootloader’s kernel line, as described in Kernel parameters.
Troubleshooting
Modules do not load
How to load or unload a Linux kernel module
Fix problem peripherals by finding and loading kernel modules.

Subscribe now
Get the highlights in your inbox every week.
This article is excerpted from chapter 15 of Linux in Action, published by Manning.
Linux manages hardware peripherals using kernel modules. Here’s how that works.
A running Linux kernel is one of those things you don’t want to upset. After all, the kernel is the software that drives everything your computer does. Considering how many details have to be simultaneously managed on a live system, it’s better to leave the kernel to do its job with as few distractions as possible. But if it’s impossible to make even small changes to the compute environment without rebooting the whole system, then plugging in a new webcam or printer could cause a painful disruption to your workflow. Having to reboot each time you add a device to get the system to recognize it is hardly efficient.
To create an effective balance between the opposing virtues of stability and usability, Linux isolates the kernel, but lets you add specific functionality on the fly through loadable kernel modules (LKMs). As shown in the figure below, you can think of a module as a piece of software that tells the kernel where to find a device and what to do with it. In turn, the kernel makes the device available to users and processes and oversees its operation.
kernels.png
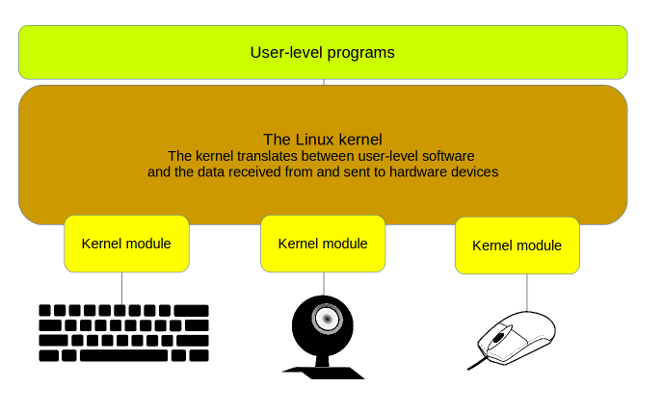
Kernel modules act as translators between devices and the Linux kernel.
There’s nothing stopping you from writing your own module to support a device exactly the way you’d like it, but why bother? The Linux module library is already so robust that there’s usually no need to roll your own. And the vast majority of the time, Linux will automatically load a new device’s module without you even knowing it.
Still, there are times when, for some reason, it doesn’t happen by itself. (You don’t want to leave that hiring manager impatiently waiting for your smiling face to join the video conference job interview for too long.) To help things along, you’ll want to understand a bit more about kernel modules and, in particular, how to find the actual module that will run your peripheral and then how to manually activate it.
Finding kernel modules
In my case, the active kernel is the version with the highest release number (4.4.0-104-generic), but there’s no guarantee that that’ll be the same for you (kernels are frequently updated). If you’re going to be doing some work with modules that you’d like to use on a live system, you need to be sure you’ve got the right directory tree.
You’ll find most of the modules organized within their subdirectories beneath the kernel/ directory. Take a few minutes to browse through those directories to get an idea of how things are arranged and what’s available. The filenames usually give you a good idea of what you’re looking at.
There are 33,350 available modules. It looks like someone’s been working hard over the years to provide us with the software to run our physical devices.
That’s how you find modules. Your next job is to figure out how to manually load an inactive module if, for some reason, it didn’t happen on its own.
Manually loading kernel modules
Before you can load a kernel module, logic dictates that you’ll have to confirm it exists. And before you can do that, you’ll need to know what it’s called. Getting that part sometimes requires equal parts magic and luck and some help from of the hard work of online documentation authors.
Linux recognized the interface (the Atheros AR9485) but listed it as unclaimed. Well, as they say, «When the going gets tough, the tough search the internet.» I ran a search for atheros ar9 linux module and, after sifting through pages and pages of five- and even 10-year-old results advising me to either write my own module or just give up, I finally discovered that (with Ubuntu 16.04, at least) a working module existed. Its name is ath9k.
Just one more step, load the module:
That’s it. No reboots. No fuss.
Here’s one more example to show you how to work with active modules that have become corrupted. There was a time when using my Logitech webcam with a particular piece of software would make the camera inaccessible to any other programs until the next system boot. Sometimes I needed to open the camera in a different application but didn’t have the time to shut down and start up again. (I run a lot of applications, and getting them all in place after booting takes some time.)
Because this module is presumably active, using lsmod to search for the word video should give me a hint about the name of the relevant module. In fact, it’s better than a hint: The only module described with the word video is uvcvideo (as you can see in the following):
There was probably something I could have controlled for that was causing the crash, and I guess I could have dug a bit deeper to see if I could fix things the right way. But you know how it is; sometimes you don’t care about the theory and just want your device working. So I used rmmod to kill the uvcvideo module and modprobe to start it up again all nice and fresh:
Again: no reboots. No stubborn blood stains.
Chapter 1. Working with kernel modules
This Chapter explains:
In order to use the kernel module utilities described in this chapter, first ensure the kmod package is installed on your system by running, as root:
1.1. What is a kernel module?
Like the kernel itself, modules can take parameters that customize their behavior. Though the default parameters work well in most cases. In relation to kernel modules, user-space tools can do the following operations:
Many of these utilities, which are provided by the kmod package, take module dependencies into account when performing operations. As a result, manual dependency-tracking is rarely necessary.
On modern systems, kernel modules are automatically loaded by various mechanisms when needed. However, there are occasions when it is necessary to load or unload modules manually. For example, when one module is preferred over another although either is able to provide basic functionality, or when a module performs unexpectedly.
1.2. Kernel module dependencies
Certain kernel modules sometimes depend on one or more other kernel modules. The /lib/modules/ /modules.dep file contains a complete list of kernel module dependencies for the respective kernel version.
The dependency file is generated by the depmod program, which is a part of the kmod package. Many of the utilities provided by kmod take module dependencies into account when performing operations so that manual dependency-tracking is rarely necessary.
The code of kernel modules is executed in kernel-space in the unrestricted mode. Because of this, you should be mindful of what modules you are loading.
Additional resources
1.3. Listing currently-loaded modules
You can list all kernel modules that are currently loaded into the kernel by running the lsmod command, for example:
The lsmod output specifies three columns:
Module
Size
Used by
Finally, note that lsmod output is less verbose and considerably easier to read than the content of the /proc/modules pseudo-file.
1.4. Displaying information about a module
You can display detailed information about a kernel module using the modinfo command.
Example 1.1. Listing information about a kernel module with lsmod
To display information about the e1000e module, which is the Intel PRO/1000 network driver, enter the following command as root :
1.5. Loading kernel modules at system runtime
The optimal way to expand the functionality of the Linux kernel is by loading kernel modules. The following procedure describes how to use the modprobe command to find and load a kernel module into the currently running kernel.
Prerequisites
Procedure
Select a kernel module you want to load.
Load the relevant kernel module:
Optionally, verify the relevant module was loaded:
If the module was loaded correctly, this command displays the relevant kernel module. For example:
The changes described in this procedure will not persist after rebooting the system. For information on how to load kernel modules to persist across system reboots, see Loading kernel modules automatically at system boot time.
Additional resources
1.6. Unloading kernel modules at system runtime
At times, you find that you need to unload certain kernel modules from the running kernel. The following procedure describes how to use the modprobe command to find and unload a kernel module at system runtime from the currently loaded kernel.
Prerequisites
Procedure
Execute the lsmod command and select a kernel module you want to unload.
If a kernel module has dependencies, unload those prior to unloading the kernel module. For details on identifying modules with dependencies, see Listing Currently Loaded Modules and Kernel module dependencies.
Unload the relevant kernel module:
Do not unload kernel modules when they are used by the running system. Doing so can lead to an unstable or non-operational system.
Optionally, verify the relevant module was unloaded:
If the module was unloaded successfully, this command does not display any output.
After finishing this procedure, the kernel modules that are defined to be automatically loaded on boot, will not stay unloaded after rebooting the system. For information on how to counter this outcome, see Preventing kernel modules from being automatically loaded at system boot time.
Additional resources
1.7. Loading kernel modules automatically at system boot time
The following procedure describes how to configure a kernel module so that it is loaded automatically during the boot process.
Prerequisites
Procedure
Select a kernel module you want to load during the boot process.
Create a configuration file for the module:
Optionally, after reboot, verify the relevant module was loaded:
The example command above should succeed and display the relevant kernel module.
The changes described in this procedure will persist after rebooting the system.
Additional resources
1.8. Preventing kernel modules from being automatically loaded at system boot time
The following procedure describes how to add a kernel module to a denylist so that it will not be automatically loaded during the boot process.
Prerequisites
Procedure
Select a kernel module that you want to put in a denylist:
The lsmod command displays a list of modules loaded to the currently running kernel.
Alternatively, identify an unloaded kernel module you want to prevent from potentially loading.
All kernel modules are located in the /lib/modules/ /kernel/ / directory.
Create a configuration file for a denylist:
The example shows the contents of the blacklist.conf file, edited by the vim editor. The blacklist line ensures that the relevant kernel module will not be automatically loaded during the boot process. The blacklist command, however, does not prevent the module from being loaded as a dependency for another kernel module that is not in a denylist. Therefore the install line causes the /bin/false to run instead of installing a module.
The lines starting with a hash sign are comments to make the file more readable.
Create a backup copy of the current initial ramdisk image before rebuilding:
The command above creates a backup initramfs image in case the new version has an unexpected problem.
Alternatively, create a backup copy of other initial ramdisk image which corresponds to the kernel version for which you want to put kernel modules in a denylist:
Generate a new initial ramdisk image to reflect the changes:
If you are building an initial ramdisk image for a different kernel version than you are currently booted into, specify both target initramfs and kernel version:
The changes described in this procedure will take effect and persist after rebooting the system. If you improperly put a key kernel module in a denylist, you can face an unstable or non-operational system.
Additional resources
1.9. Signing kernel modules for secure boot
Red Hat Enterprise Linux 7 includes support for the UEFI Secure Boot feature, which means that Red Hat Enterprise Linux 7 can be installed and run on systems where UEFI Secure Boot is enabled. Note that Red Hat Enterprise Linux 7 does not require the use of Secure Boot on UEFI systems.
If Secure Boot is enabled, the UEFI operating system boot loaders, the Red Hat Enterprise Linux kernel, and all kernel modules must be signed with a private key and authenticated with the corresponding public key. If they are not signed and authenticated, the system will not be allowed to finish the booting process.
The Red Hat Enterprise Linux 7 distribution includes:
In addition, the signed first-stage boot loader and the signed kernel include embedded Red Hat public keys. These signed executable binaries and embedded keys enable Red Hat Enterprise Linux 7 to install, boot, and run with the Microsoft UEFI Secure Boot Certification Authority keys that are provided by the UEFI firmware on systems that support UEFI Secure Boot.
Not all UEFI-based systems include support for Secure Boot.
The information provided in the following sections describes the steps to self-sign privately built kernel modules for use with Red Hat Enterprise Linux 7 on UEFI-based build systems where Secure Boot is enabled. These sections also provide an overview of available options for importing your public key into a target system where you want to deploy your kernel modules.
To sign and load kernel modules, you need to:
1.9.1. Prerequisites
To be able to sign externally built kernel modules, install the utilities listed in the following table on the build system.
Table 1.1. Required utilities
Generates public and private X.509 key pair
Perl script used to sign kernel modules
Perl interpreter used to run the signing script
Optional utility used to manually enroll the public key
Optional utility used to display public keys in the system key ring
The build system, where you build and sign your kernel module, does not need to have UEFI Secure Boot enabled and does not even need to be a UEFI-based system.
1.9.2. Kernel module authentication
In Red Hat Enterprise Linux 7, when a kernel module is loaded, the module’s signature is checked using the public X.509 keys on the kernel’s system key ring, excluding keys on the kernel’s system black-list key ring. The following sections provide an overview of sources of keys/keyrings, examples of loaded keys from different sources in the system. Also, the user can see what it takes to authenticate a kernel module.
1.9.2.1. Sources for public keys used to authenticate kernel modules
During boot, the kernel loads X.509 keys into the system key ring or the system black-list key ring from a set of persistent key stores as shown in the table below.
Table 1.2. Sources for system key rings
| Source of X.509 keys | User ability to add keys | UEFI Secure Boot state | Keys loaded during boot |
|---|---|---|---|